更新日 2022/7/12
【Unity】CustomEditorを使わないでボタンを表示するエディター拡張方法を紹介します!
CustomEditorを使わないでインスペクター上にボタンを表示する方法を紹介します。

目次
ボタンを表示する属性を作成する
ボタンを表示用のButtonAttributeを作成します。
ButtonAttribute.cs
using System;

namespace UnityEngine
{
    [AttributeUsage(AttributeTargets.Field)]
    public class ButtonAttribute : PropertyAttribute
    {
        public readonly string label;
        public readonly string method;
        public ButtonAttribute(string label, string method)
        {
            this.label = label;
            this.method = method;
        }
    }
}
labelはボタンに表示したい文字列で methodは呼び出したい関数名です。
使い方は以下のような感じです。
変数自体はダミーなのでシリアライズ可能な型ならなんでも良いです。
[Button("私を押して", "ButtonClicked")]
public int clickMe;
ボタンを表示するButtonDrawerを作成する
ボタンを表示して押されたときに指定した関数を呼び出すようにします。
リフレクションを利用してメソッドを取得して実行します。
ButtonDrawer.cs
using System.Reflection;
using UnityEngine;

namespace UnityEditor
{
    [CustomPropertyDrawer(typeof(ButtonAttribute))]
    public class ButtonDrawer : PropertyDrawer
    {
        public override void OnGUI(Rect position, SerializedProperty property, GUIContent label)
        {
            var button = attribute as ButtonAttribute;

            if (GUI.Button(position, string.IsNullOrEmpty(button.label) ? label.text : button.label))
            {
                var obj = property.serializedObject.targetObject;
                MethodInfo method = obj.GetType().GetMethod(button.method, BindingFlags.Public | BindingFlags.Instance);
                method.Invoke(obj, null);
            }
        }
    }
}
SendMessage関数を使えば良いのでは?
SendMessageを使えばもっと簡潔に記述できるんじゃないの?と思いましたが
実行時に使えと警告が出てしまいますので諦めました。
Component comp = property.serializedObject.targetObject as Component;
comp.SendMessage(button.method);
作成したボタンを実際に使ってみる
テスト用のMonoBehaviourを継承したクラスを作成します。
ボタンを押したときに呼び出す関数はpublicでstaticではない関数にして下さい。
using UnityEngine;

public class TestScript : MonoBehaviour
{
    [Button("私を押して", "ButtonClicked")]
    public int clickMe;

    public void ButtonClicked()
    {
        Debug.Log("ボタンが押されました");
    }
}
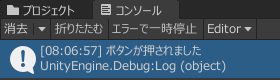
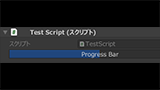
インスペクター上にボタンが表示されます。
ボタンを押すとButtonClicked関数が呼ばれ、コンソールにメッセージが出力されます。
以上で終了です。
カスタムエディターを作成せずにインスペクターでボタンを扱う方法を紹介しました。
ちょっとしたテストやデバッグにも使えますね。
関連ページ
こちらのページも合わせてご覧下さい。

【Unity】エディター拡張方法をまとめます!2022/9/21
【Unity】Vector4を1行で表示するエディター拡張を紹介します!2022/7/6
【Unity】両端編集可能なスライダーを表示するエディター拡張を紹介します!2022/7/11
【Unity】ツールバー表示するエディター拡張方法を紹介します!2022/7/14
【Unity】プログレスバーを表示するエディター拡張方法を紹介します!2022/7/15